
Download UniGetUI for Windows
One app to manage all your Windows packages. UniGetUI brings WinGet, Scoop, Chocolatey, and more under a single, clean interface.
What Is UniGetUI?
A single graphical interface that puts every Windows package manager at your fingertips.
Package Management Without the Command Line
UniGetUI is a free, open-source application that gives Windows users a visual way to install, update, and remove software through multiple package managers. Instead of typing commands into PowerShell or CMD, you get a searchable list of thousands of packages from WinGet, Scoop, Chocolatey, Pip, Npm, .NET Tool, and PowerShell Gallery — all inside one window.
Built with C# and .NET by developer Marti Climent, UniGetUI (previously known as WingetUI) has grown into one of the most popular open-source Windows utilities on GitHub, with more than 21,600 stars. The app follows Windows 11 Fluent Design patterns, so it feels like a native part of the operating system rather than a bolt-on tool.
Who Is It For?
Anyone who installs or maintains software on Windows 10 or Windows 11 machines. System administrators use UniGetUI to roll out standard application sets across workstations. Developers rely on it to keep their toolchains current. Regular users appreciate the update notifications that appear in the system tray — no more hunting through individual apps to check for patches.
Why It Stands Out
Most package manager GUIs wrap a single source. UniGetUI connects to seven at once, so you can grab Chrome from WinGet, Python packages from Pip, and Node modules from Npm without switching tools. Batch operations let you queue up dozens of installs or updates and run them together. You can also back up your entire software list to a file, then restore it on a fresh machine in minutes.
The app is completely free under the MIT license. There are no premium tiers, no ads, and no telemetry. Updates ship frequently — the current release is version 3.3.7 — and the community actively contributes bug fixes and translations through GitHub.
Ready to try it? Download UniGetUI and start managing your Windows software the easy way.
What makes UniGetUI different
Managing Windows software used to mean juggling WinGet, Scoop, Chocolatey, and more from the command line. UniGetUI puts all of them behind one visual interface.
7 package managers, one window
WinGet, Scoop, Chocolatey, Pip, Npm, .NET Tool, and PowerShell Gallery all show up in the same searchable list. No more switching between terminals.
Install, update, remove in one click
Find what you need, click install, and UniGetUI handles the rest. Updates and uninstalls work the same way. No flags to memorize, no syntax to look up.
Automatic update alerts
UniGetUI checks your installed packages for new versions and shows a badge count. You can update everything at once, pick specific apps, or skip a version you want to avoid.
Batch operations with a queue
Select multiple packages and run them through a queue. Handy for setting up a fresh Windows install or updating 20 apps without babysitting each one.
Cloud backup via GitHub
Export your full package list to a GitHub-hosted file. When you set up a new machine, import that list and reinstall everything with a few clicks.
System tray with live badges
UniGetUI sits quietly in your system tray and shows a count of available updates. Click the icon to open the app, update what you need, then minimize it again.
Share packages by URL
Generate a shareable link for any package. Send it to a coworker or drop it in a README, and they can install the same app with one click through UniGetUI.
Custom install parameters
Need to pass specific flags or set a custom install path? UniGetUI lets you define parameters per package. The settings persist across future updates too.
Package details before you install
Click any package to see its publisher, version history, size, license, and dependencies. You know what you are getting before anything touches your system.
Windows Widget and Dev Home
A native Windows Widget shows pending updates right on your desktop. Dev Home integration means developers can track package status alongside other dev tools.
UniGetUI is open source under the MIT license — download it free and try it yourself.
System Requirements
Check that your PC meets these specs before installing UniGetUI. The app runs well on most modern Windows hardware.
Operating System
Processor (CPU)
Memory (RAM)
Disk Space
Display
Internet Connection
UniGetUI requires .NET Desktop Runtime 8.0+, which the installer handles automatically. At least one package manager (WinGet ships with Windows 10/11 by default) must be present for the app to discover packages.
Download UniGetUI
Grab the installer or use your preferred package manager. UniGetUI works on Windows 10 and 11 with no extra dependencies required.
UniGetUI Installer for Windows
Download UniGetUIUniGetUI.Installer.exe · Windows 10/11 (64-bit)Install directly from the Microsoft Store with automatic updates built in.
Open in StoreUse the built-in Windows Package Manager from any terminal.
Scoop
scoop install unigetui
Chocolatey
choco install unigetui
Need help after installing? Check out the Getting Started guide below.
Screenshots
See UniGetUI in action — from package discovery to bulk updates, all through a clean Windows-native interface.
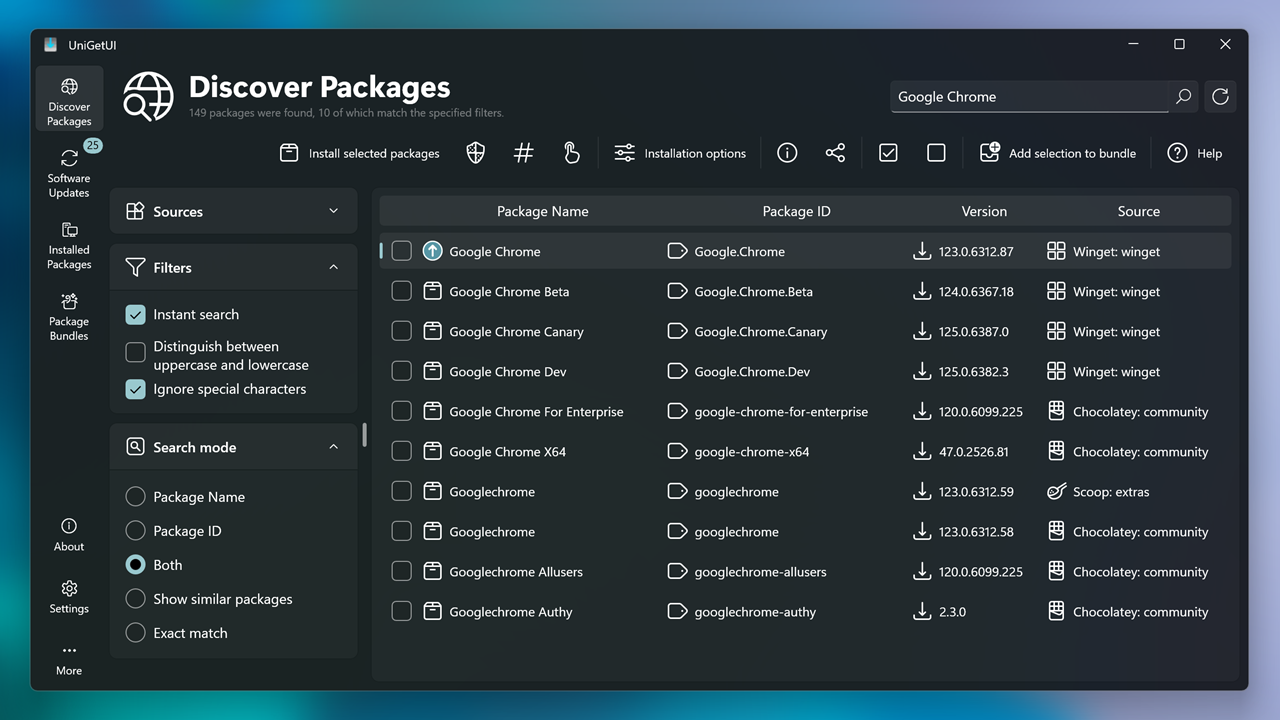

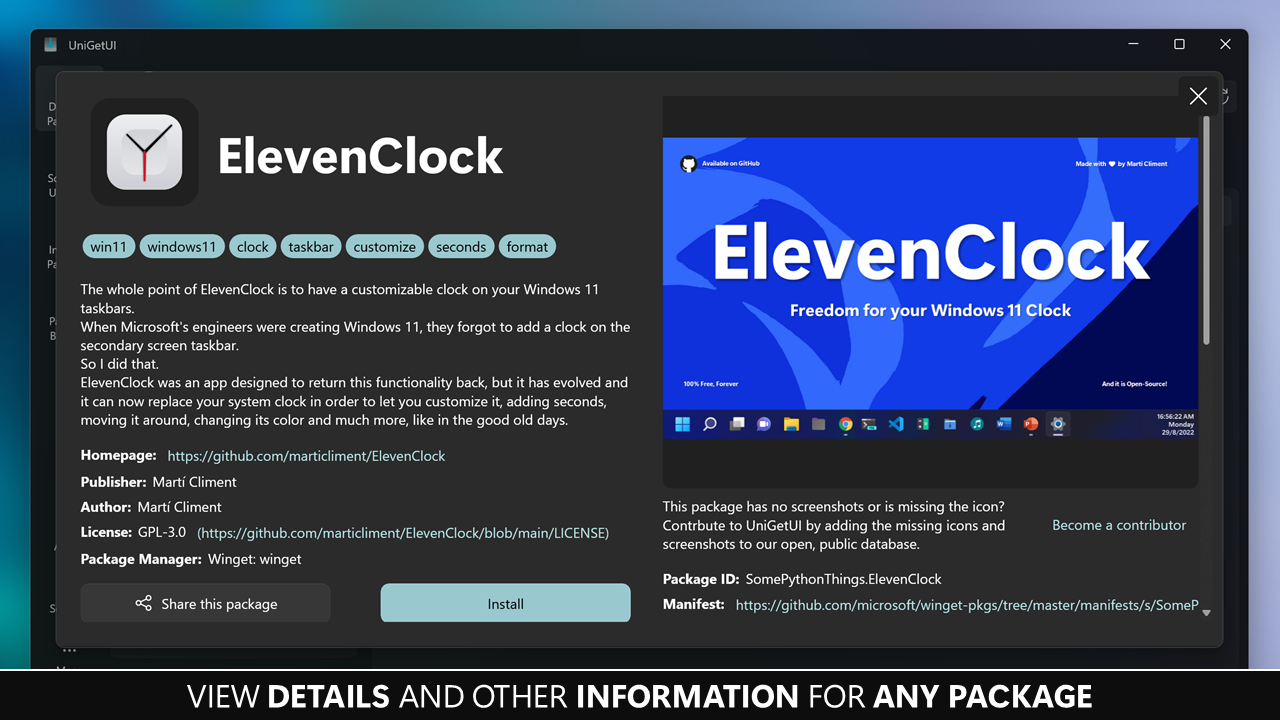
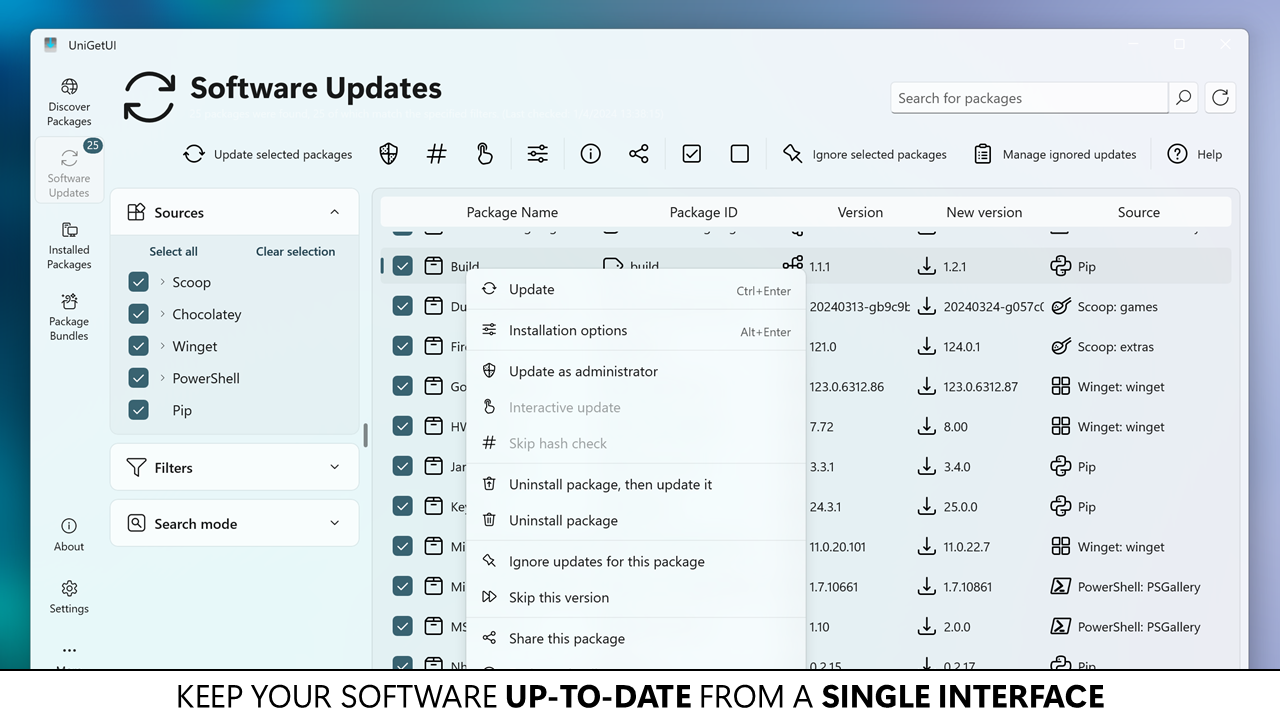
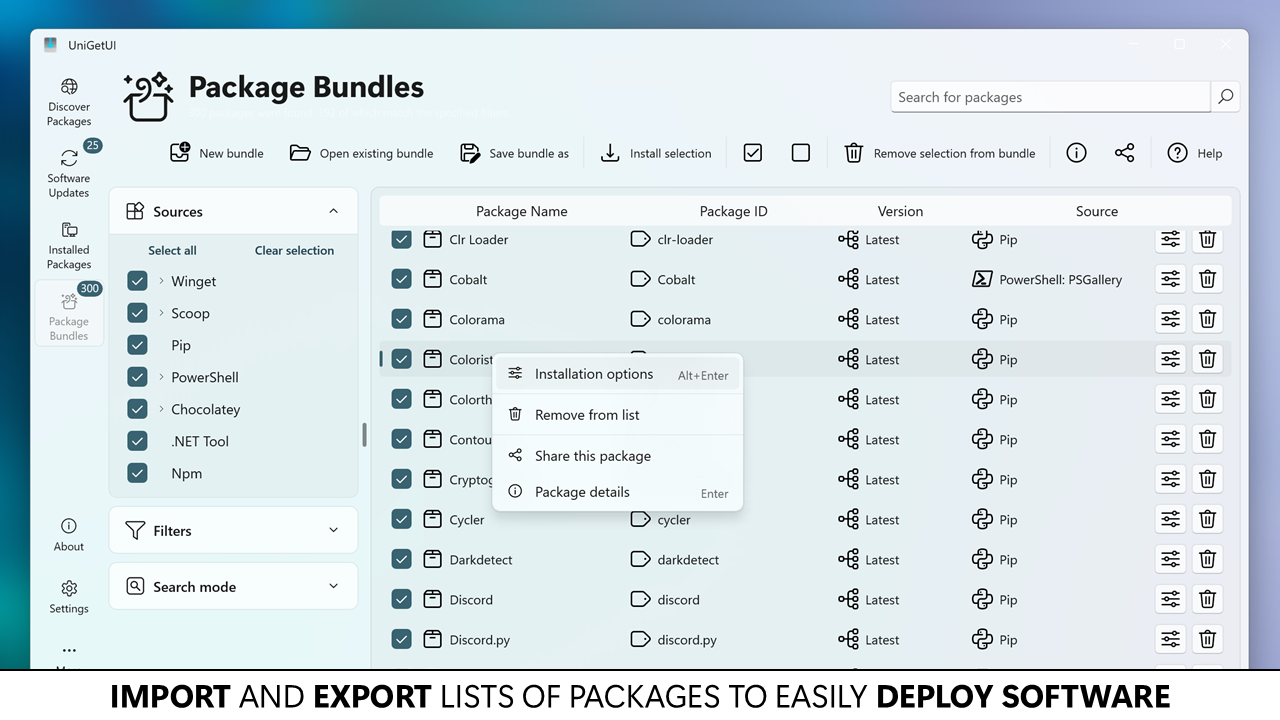
Click any screenshot to enlarge. All images from the official UniGetUI repository.
Frequently Asked Questions
Answers to the most common questions about downloading, installing, and using UniGetUI on your Windows PC.
Is UniGetUI safe to download and install?
Yes, UniGetUI is completely safe to download and install. The project is open source under the MIT license, with over 21,600 stars on GitHub and thousands of active users reviewing the code daily. Every release is built from public source code that anyone can audit.
The installer (UniGetUI.Installer.exe, approximately 25 MB) is digitally signed by the developer Marti Climent. UniGetUI has been available since 2022 under its original name WingetUI, and the codebase has been reviewed by security researchers, Microsoft MVPs, and package manager maintainers. The app does not collect personal data, does not inject ads, and does not bundle third-party software during installation.
- Source code is fully public at github.com/marticliment/UniGetUI
- MIT license allows unrestricted use and inspection
- No adware, spyware, or bundled toolbars
- Available through trusted channels: Microsoft Store, WinGet, Chocolatey, and Scoop
Pro tip: If your antivirus flags UniGetUI (CrowdStrike and ESET occasionally trigger false positives after the rename from WingetUI), add it to your exclusion list. GitHub Issues #3461 and #379 track these false positive reports.
For verified download links, visit our Download section.
Why does my antivirus flag UniGetUI as a virus?
Antivirus false positives with UniGetUI are a known issue, primarily caused by the 2024 rename from WingetUI to UniGetUI. The name change altered file signatures and hashes, which some heuristic-based scanners temporarily flagged as suspicious.
CrowdStrike Falcon, ESET NOD32, and certain Windows Defender configurations have been the most frequently reported culprits. The false positive typically triggers on the executable itself or on the .NET runtime components that UniGetUI uses. Since UniGetUI manages other applications by calling package manager CLIs (winget.exe, scoop, choco), some security tools misidentify this behavior as potentially unwanted automation.
- Open your antivirus settings panel
- Navigate to exclusions or allowlist
- Add the UniGetUI installation directory (default:
C:\Program Files\UniGetUI) - Also add
%localappdata%\UniGetUIwhere runtime data is stored - Restart UniGetUI after applying the exclusion
Pro tip: Installing UniGetUI from the Microsoft Store bypasses most antivirus interference because Microsoft performs their own security review for Store apps.
Check our Features section to understand what UniGetUI actually does under the hood.
Does UniGetUI collect telemetry or personal data?
No, UniGetUI does not collect any telemetry or personal data. The developer considered adding optional telemetry in GitHub Discussion #2706, but the proposal was never implemented after community feedback.
UniGetUI operates entirely locally on your machine. It does not phone home, does not require an account, and does not transmit usage statistics. The only network requests the app makes are to query package repositories (WinGet, Chocolatey, Scoop servers) for available software and updates. These requests go directly to the package manager servers, not to UniGetUI’s infrastructure.
- No analytics or tracking code in the application
- No account creation or sign-in required
- Network traffic limited to package manager API calls
- The underlying WinGet client may send minimal anonymous usage data to Microsoft, which you can disable through Windows privacy settings under Diagnostics & Feedback
Pro tip: You can verify the absence of telemetry by monitoring UniGetUI’s network traffic with a tool like Wireshark or Process Monitor. You will only see connections to package registry endpoints.
Learn more about what UniGetUI does with your data in our Overview section.
Does UniGetUI work on Windows 11?
Yes, UniGetUI works on Windows 11 and is fully optimized for it. Windows 11 ships with WinGet pre-installed, which means UniGetUI can start managing packages immediately after installation with zero additional configuration.
UniGetUI version 3.3.7 was built using C# and .NET, and it follows the WinUI 3 design language that matches the Windows 11 aesthetic. The app supports both Windows 11 Home and Pro editions, including the latest 24H2 update. It integrates with Windows 11-specific features like the Widgets board (showing pending updates) and Dev Home for developer workflows.
- Windows 11 22H2 and later: full support, WinGet pre-installed
- Windows 10 version 1809+: supported, but you may need to install WinGet manually from the Microsoft Store (search for “App Installer”)
- Windows 10 LTSC/LTSB: limited support, WinGet must be sideloaded
- ARM64 (Surface Pro X, Snapdragon laptops): supported through x86 emulation
Pro tip: On a fresh Windows 11 installation, run winget --version in PowerShell first to confirm WinGet is available before launching UniGetUI. If the command fails, update “App Installer” from the Microsoft Store.
Check the System Requirements section for full hardware specifications.
Can I use UniGetUI on macOS or Linux?
No, UniGetUI is a Windows-only application. It runs exclusively on Windows 10 and Windows 11 (64-bit). There are no macOS or Linux versions available, and the developer has no plans to port it to other operating systems.
This design decision makes sense because UniGetUI exists to solve a problem specific to Windows: the lack of a unified graphical package manager. Linux distributions already ship with built-in GUI package managers (Ubuntu Software Center, GNOME Software, KDE Discover, Pamac) that handle multiple repositories natively. macOS has Homebrew with third-party GUIs like Cork.
- macOS alternative: Homebrew (command line) with Cork or Applite as GUI frontends
- Ubuntu/Debian: GNOME Software or Synaptic Package Manager
- Fedora: GNOME Software handles RPM and Flatpak
- Arch Linux: Pamac or Octopi for graphical package management
Pro tip: If you manage both Windows and Linux machines, use UniGetUI on Windows and export your package list as a JSON bundle. While you cannot import it on Linux directly, it serves as a reference list when setting up equivalent packages on your Linux system.
See all supported platforms in our Download section.
Does UniGetUI support 32-bit Windows?
No, UniGetUI does not support 32-bit (x86) Windows installations. The application requires a 64-bit (x64) version of Windows 10 or Windows 11 to run. This limitation comes from UniGetUI’s dependency on .NET 8 runtime and WinGet, both of which are 64-bit only.
If you are running a 32-bit Windows system, your options are limited because the underlying package managers themselves do not support 32-bit anymore. WinGet dropped 32-bit support entirely, and Chocolatey’s CLI works on 32-bit but with a shrinking package selection. Microsoft stopped selling 32-bit Windows 10 to OEMs in 2020, and Windows 11 has no 32-bit version at all.
- Check your system type: Settings > System > About > “System type” field
- If it says “64-bit operating system,” you can run UniGetUI
- If it says “32-bit operating system,” consider upgrading to 64-bit Windows (free if you have a valid license)
Pro tip: If you are stuck on 32-bit Windows for hardware reasons, you can still use Chocolatey directly from the command line with choco install [package] as a partial alternative to UniGetUI.
Review the full hardware specifications in our System Requirements section.
Is UniGetUI completely free to use?
Yes, UniGetUI is 100% free to download and use with no restrictions. There is no paid version, no premium tier, no feature gating, and no ads. Every feature available in UniGetUI is accessible to every user without payment.
The project is released under the MIT license, one of the most permissive open-source licenses available. This means you can use UniGetUI for personal, educational, and commercial purposes without paying anything. The developer Marti Climent maintains the project through voluntary contributions. You can optionally support development through GitHub Sponsors, but this is not required and does not unlock additional features.
- All 7+ package manager integrations included free (WinGet, Scoop, Chocolatey, Pip, Npm, .NET Tool, PowerShell Gallery)
- Bulk operations, backup/restore, automatic updates — all free
- No trial period, no expiration, no license key required
- Commercial use explicitly permitted under MIT license
Pro tip: While UniGetUI itself is free, some package managers it connects to have paid tiers. Chocolatey Pro ($17/month) and Chocolatey Business ($40/month) offer enterprise features like package internalization and virus scanning. These are separate from UniGetUI and only relevant for large-scale enterprise deployments.
Ready to get started? Head to the Download section to grab UniGetUI.
What license does UniGetUI use?
UniGetUI uses the MIT license, which is one of the most permissive and widely-used open-source licenses in software development. The full license text is available in the project’s GitHub repository.
Under the MIT license, you are free to use, copy, modify, merge, publish, distribute, sublicense, and even sell copies of the software. The only requirement is that the original copyright notice and license text must be included in any copies or substantial portions of the software. There are no restrictions on commercial use, no copyleft obligations, and no requirement to open-source your own modifications.
- Personal use: Completely unrestricted
- Enterprise/corporate: Free to deploy across your organization
- Redistribution: Allowed, as long as the license notice is included
- Modification: You can fork and modify UniGetUI freely
Pro tip: If you are an IT administrator evaluating UniGetUI for company-wide deployment, the MIT license means you do not need legal approval beyond standard open-source policy review. Many Fortune 500 companies already permit MIT-licensed tools by default.
Learn more about what UniGetUI offers on the Features page.
How do I download and install UniGetUI step by step?
You can download and install UniGetUI in under two minutes. The recommended method is the official .exe installer (approximately 25 MB), which handles everything automatically including .NET runtime dependencies.
UniGetUI offers six different installation methods depending on your preference. The .exe installer from the official website is the simplest path for most users. If you already use a package manager, you can install UniGetUI through WinGet, Chocolatey, or Scoop with a single command. The Microsoft Store version auto-updates silently but may lag slightly behind the GitHub release.
- Visit our Download section and click “Download UniGetUI”
- Run UniGetUI.Installer.exe when the download completes
- If Windows SmartScreen appears, click “More info” then “Run anyway” — the installer is signed but new signatures sometimes trigger SmartScreen
- Follow the Inno Setup wizard: accept the license, choose installation directory (default is fine), select “Create desktop shortcut” if desired
- Click Install and wait approximately 15-30 seconds
- Launch UniGetUI — on first run, it will detect which package managers are available on your system
Pro tip: For silent/unattended installation (useful for IT deployments), use the command-line flags: UniGetUI.Installer.exe /VERYSILENT /SUPPRESSMSGBOXES /NORESTART /ALLUSERS
For a detailed walkthrough including initial configuration, see our Getting Started guide.
Is there a portable version of UniGetUI?
UniGetUI does not offer an official portable version. The standard installation uses the Inno Setup installer, which places files in Program Files and registers the app with Windows for automatic startup and update management.
The developer addressed this in GitHub Discussion #622, explaining that UniGetUI relies on system-level package manager integrations (WinGet, Scoop, Chocolatey) that themselves require proper installation. A fully portable version would not be able to access these integrations reliably. However, some users have successfully created a semi-portable setup by installing to a custom directory using the /DIR="D:\Apps\UniGetUI" installer flag.
- Standard installer: places files in
C:\Program Files\UniGetUI - User data stored in
%localappdata%\UniGetUI - Custom directory install:
UniGetUI.Installer.exe /DIR="X:\YourPath" - The Microsoft Store version is sandboxed and cannot be made portable
Pro tip: If you need UniGetUI on a USB drive for use on multiple PCs, install it to the USB drive using the /DIR flag. Be aware that each PC still needs the package managers themselves (WinGet, Scoop, etc.) installed locally for UniGetUI to function.
Download the standard installer from our Download section.
How to fix UniGetUI installation errors on Windows?
Most UniGetUI installation errors stem from .NET runtime conflicts or Windows permissions issues. The installer requires .NET 8 runtime, and if an incompatible version is already present, the setup may fail silently or show a cryptic error message.
The most common installation problem reported on GitHub is the installer hanging at the .NET dependency check on systems that have multiple .NET versions installed. Windows 10 version 1809 users also occasionally see compatibility warnings because WinGet requires the “App Installer” package from the Microsoft Store, which may not be present on older installations.
- Run the installer as Administrator: right-click UniGetUI.Installer.exe and select “Run as administrator”
- If the installer hangs, close it, open PowerShell as Admin, and run
winget install Microsoft.DotNet.DesktopRuntime.8to pre-install the required runtime - Temporarily disable your antivirus (CrowdStrike and ESET are known to block the installer)
- If Windows SmartScreen blocks the file, click “More info” then “Run anyway”
- For persistent failures, try the Microsoft Store version: search “UniGetUI” in the Store app
Pro tip: If the .exe installer keeps failing, bypass it entirely by installing through WinGet itself: open PowerShell and run winget install MartiCliment.UniGetUI. This method handles dependencies automatically.
See all available installation methods in our Download section.
How to fix UniGetUI not opening or crashing on startup?
If UniGetUI crashes or refuses to open, the most likely cause is a corrupted cache or configuration file. Version 3.3.1 introduced a self-healing mechanism that handles most startup failures automatically, so updating to the latest version should be your first step.
The app stores its runtime data and settings cache in %localappdata%\UniGetUI. Corrupted entries in this folder can prevent the application from initializing. Enterprise antivirus solutions (particularly CrowdStrike Falcon) have also been reported to block UniGetUI’s process from starting, flagging the .NET host as suspicious activity.
- Close UniGetUI completely (check the system tray — right-click the icon and select “Quit”)
- Open File Explorer and navigate to
%localappdata%\UniGetUI - Delete the entire UniGetUI folder (this resets all cached data without affecting installed packages)
- Restart UniGetUI — it will rebuild its cache on first launch
- If the problem persists, uninstall and reinstall the latest version from our Download section
Pro tip: If UniGetUI was working fine and broke after a Windows update, check if the .NET Desktop Runtime got modified. Run dotnet --list-runtimes in PowerShell to verify .NET 8 is still present.
For additional troubleshooting steps, see our Getting Started guide.
How to fix the “WinGet malfunction detected” error in UniGetUI?
The “WinGet malfunction detected” error is the single most reported issue in UniGetUI. It occurs when the WinGet source index becomes corrupted or outdated, preventing UniGetUI from querying available packages. GitHub Issues #3087, #3153, and #3055 track variations of this problem.
WinGet maintains a local copy of the package repository index. When this index fails to sync (due to network timeouts, proxy interference, or Windows Update changing component versions), UniGetUI cannot communicate with WinGet and displays the malfunction warning. The error is not caused by UniGetUI itself but by the underlying WinGet service.
- Open PowerShell as Administrator
- Run
winget source reset --forceto reset all package sources to default - Then run
winget source updateto refresh the index - Restart UniGetUI
- If the error persists, open UniGetUI Settings > Package Managers > WinGet and enable “Use bundled WinGet” to bypass the system WinGet installation
Pro tip: On corporate networks with restrictive firewalls, WinGet may not be able to reach its CDN (cdn.winget.microsoft.com). Ask your IT team to allowlist this domain, or switch to Scoop/Chocolatey as your primary package source within UniGetUI.
Review all package manager options in our Features section.
Why are some packages failing to update in UniGetUI?
Package update failures in UniGetUI usually stem from version conflicts, hash mismatches, or applications that were updated by another mechanism (like the app’s own auto-updater) before UniGetUI could apply the update.
When you click “Update” in UniGetUI, it passes the command to the relevant package manager (WinGet, Scoop, Chocolatey, etc.). If that package manager reports a failure, UniGetUI displays the error. Common causes include: the application is currently running and locking its files, the package requires administrator privileges that were not granted, the download hash does not match the manifest (corrupted download), or a parallel update process already updated the app to the latest version.
- App is running: Close the application before updating it through UniGetUI
- Admin required: Right-click the package in UniGetUI and select “Run as administrator” for the update
- Hash mismatch: Wait 24-48 hours and retry — the package maintainer likely needs to update the manifest
- Already updated: Click “Ignore this version” to clear the false update notification
- Parallel conflicts: Disable the app’s built-in auto-updater if managing it through UniGetUI (GitHub Discussion #3489)
Pro tip: For stubborn updates, try switching package managers. If a WinGet update fails for an app, check if the same app is available through Chocolatey or Scoop. UniGetUI searches across all enabled sources.
See how to configure update behavior in our Getting Started guide.
How do I update UniGetUI to the latest version?
The safest way to update UniGetUI is through a package manager command rather than the built-in self-update. Run winget upgrade MartiCliment.UniGetUI in PowerShell to update to the latest stable release.
UniGetUI’s self-update mechanism has had reliability issues in past versions. GitHub Issue #3706 documents cases where the self-update process failed mid-download or corrupted the installation. The developer now recommends adding UniGetUI to its own update ignore list and updating it externally. The current version as of early 2026 is v3.3.7, released on February 1, 2025, with fixes for startup crashes and performance improvements.
- Open PowerShell (regular user permissions are fine)
- Run
winget upgrade MartiCliment.UniGetUI - Alternatively, download the latest installer from our Download section and run it over the existing installation
- If you use Chocolatey:
choco upgrade unigetui - If you use Scoop:
scoop update unigetui
Pro tip: To prevent the self-update from interfering, open UniGetUI > Installed Packages > find UniGetUI > right-click > “Ignore updates for this package.” Then manage updates manually through your preferred method above.
Check our download page for the latest version information.
What is the difference between WingetUI and UniGetUI?
WingetUI and UniGetUI are the same application. The project was renamed from WingetUI to UniGetUI in version 3.1.0 to reflect its expanded support beyond just WinGet. The name change happened in 2024.
When the project started, it only supported Microsoft’s WinGet package manager, so “WingetUI” made sense. As the developer added support for Scoop, Chocolatey, Pip, Npm, .NET Tool, and PowerShell Gallery, the name no longer reflected the app’s scope. The package ID changed from SomePythonThings.WingetUIStore to MartiCliment.UniGetUI, and the GitHub repository URL was updated accordingly. All settings, preferences, and configurations transfer automatically during the upgrade.
- Same developer (Marti Climent), same codebase, same features
- If you have WingetUI installed, updating to the latest version automatically transitions you to UniGetUI
- The old WinGet package ID still works:
winget install SomePythonThings.WingetUIStoreredirects to UniGetUI - Some antivirus false positives occurred after the rename because file signatures changed (see the safety FAQ above)
Pro tip: If you are searching for help online, try both “WingetUI” and “UniGetUI” as search terms. Many older tutorials, Reddit threads, and Stack Overflow answers still reference the WingetUI name.
Learn about all the package managers UniGetUI supports in our Features section.
UniGetUI vs WinGet command line – which should I use?
Use UniGetUI if you want a visual interface for package management. Use WinGet CLI directly if you prefer terminal workflows or need to script package operations. UniGetUI is built on top of WinGet (among other managers), so you are not choosing between them — UniGetUI uses WinGet under the hood.
WinGet CLI is a command-line tool included with Windows 11 and available through the Microsoft Store for Windows 10. It handles package installation, updates, and removal through text commands like winget install Firefox. UniGetUI wraps this functionality in a graphical interface and adds features that WinGet CLI does not have: searching across multiple package managers simultaneously, visual update notifications in the system tray, bulk operations, package list backup/restore, and per-package custom installation parameters.
- UniGetUI advantages: Visual browsing, multi-manager search, bulk operations, system tray notifications, no command memorization needed
- WinGet CLI advantages: Faster for single operations, scriptable with PowerShell, lower resource usage, works over SSH/remote sessions
- IT admin recommendation: Use WinGet CLI in deployment scripts and UniGetUI on your workstation for day-to-day management
Pro tip: You can use both simultaneously. UniGetUI does not conflict with direct WinGet CLI usage. Any package installed via winget install will appear in UniGetUI’s installed packages list automatically.
See all UniGetUI capabilities in our Features section.
UniGetUI vs Ninite – which is better for installing software?
UniGetUI and Ninite solve different problems. Ninite is best for initial PC setup when you need to install a batch of common applications quickly. UniGetUI is better for ongoing software management, updates, and power-user control over multiple package sources.
Ninite supports approximately 100 curated applications and focuses on a simple “check boxes, click download, walk away” experience. It excels at setting up a fresh Windows installation with browsers, media players, and utilities in one pass. UniGetUI accesses thousands of packages across WinGet (over 4,000 packages), Chocolatey (over 9,000), and Scoop (over 5,000), with continuous update monitoring and granular control over each installation.
- Choose Ninite if: You are setting up a new PC, want zero configuration, and only need mainstream apps
- Choose UniGetUI if: You want ongoing update management, access to developer tools and niche software, multiple package manager support, and per-package configuration
- Ninite free version: Personal use only, limited to ~100 apps
- UniGetUI: Free for all use cases, 18,000+ packages across all sources combined
Pro tip: Many power users use both: Ninite for the initial OS setup, then UniGetUI for everything after that. They do not conflict with each other.
Download UniGetUI from our Download section to try it yourself.
How do I backup and restore my installed packages with UniGetUI?
UniGetUI can export your entire installed software list to a JSON bundle file, which you can import on a new PC to reinstall everything in bulk. This is one of its most valuable features for system migrations and fresh Windows installations.
The backup system captures package names, IDs, versions, and source managers (WinGet, Scoop, Chocolatey, etc.) into a structured JSON file. When you import the bundle on a new machine, UniGetUI queues all packages for installation and processes them sequentially. Note that GitHub Issue #2749 documents a known quirk: WinGet packages may not appear in the restored list on first run if the WinGet source index has not finished syncing.
- Open UniGetUI and go to the “Installed Packages” tab
- Click the menu icon (three dots) at the top-right
- Select “Export installed packages” or “Backup installed packages”
- Choose a save location for the .json bundle file
- On your new PC, install UniGetUI, then click “Open or create bundle” from the main screen
- Select your backup .json file and UniGetUI will queue all packages for installation
Pro tip: You can also store your package bundle on GitHub for cloud backup. Go to Settings > Backup and connect your GitHub account. UniGetUI will automatically sync your package list to a private gist.
Learn more advanced features in our Features section.
How do I ignore or skip updates for specific packages in UniGetUI?
You can ignore updates for any package in UniGetUI by right-clicking the package and selecting either “Ignore updates for this package” (permanently) or “Skip this version only” (until the next release). Both options are available from the context menu in the Software Updates tab.
This feature is useful when a new version introduces breaking changes, when you need to stay on a specific version for compatibility reasons, or when a package’s auto-updater conflicts with UniGetUI’s update mechanism. UniGetUI stores the ignore list locally, and it persists across app restarts. You can review and modify ignored packages at any time through the Settings panel or the Installed Packages view.
- Open UniGetUI and navigate to the “Software Updates” tab
- Find the package you want to exclude
- Right-click the package name
- Select “Ignore updates for this package” (permanent) or “Skip version X.X.X” (until next version)
- To un-ignore later: go to Settings > General > “Manage ignored updates” or right-click the package in Installed Packages and select “Stop ignoring updates”
Pro tip: For applications that have their own reliable auto-update system (like Chrome, Firefox, VS Code), consider adding them to the ignore list in UniGetUI. This prevents duplicate update attempts and reduces unnecessary background processing.
See all package management capabilities in our Features section.
How to stop UniGetUI from starting automatically with Windows?
UniGetUI registers itself as a startup application during installation to provide background update monitoring. You can disable this through Task Manager, UniGetUI’s own settings, or by creating a special file in the app’s data folder.
By default, UniGetUI runs in the system tray on Windows startup and periodically checks for package updates. This uses approximately 50-80 MB of RAM when idle. If you prefer to launch UniGetUI manually only when you need it, you have three methods to disable auto-start, each with different implications for update notifications.
- Method 1 (recommended): Open UniGetUI > Settings > General > uncheck “Start UniGetUI at login”
- Method 2: Press Ctrl+Shift+Esc to open Task Manager > Startup tab > find UniGetUI > click Disable
- Method 3: Create an empty file named
DisableAutoCheckforUpdatesin%localappdata%\UniGetUI
Pro tip: If you want update notifications but do not want UniGetUI consuming resources constantly, use Method 1 and instead create a Windows Task Scheduler task that launches UniGetUI once daily at a time you choose. This gives you update alerts without the always-on background process.
For more configuration options, visit our Getting Started guide.
Still have questions? Visit the UniGetUI community on GitHub or download UniGetUI to try it yourself.